Using C# with Graph API - Part 2.1 - Authentication - The client credential flow
The client credential flow
This post is one in a series about using Graph API with C#, It’s broken down into the following parts
- Part 1: Getting started with C# and VScode
- Part 2.1: Getting started with Authentication - Client credential flow (You Are Here)
- Part 2.2: Getting started with Authentication - Interactive authentication
- Part 3: Types of Graph calls
- Part 4: User management
- Part 5: Applications
- Part 6: Interacting with devices
- Part 7: 429 Too Many Requests
In this post, and Part 2.2, we’ll look at 2 methods of authenticating with Graph API using our app from part 1 as a foundation.
Authentication is a dark art in my opion, and it can definitely get wild. A great resource for understanding the authentication methods we’re going to look at comes from the Intune Training team.
The first method we’ll look at is using the client credential flow and API permissions we configured. This can be the simpler approach to authentication, as your authentication credentials are stored in code and you don’t need to interact with it all. Storing credentials in code is not something I would recommend. In 2.2 we’ll look at how to authenticate without storing credentials in code.
The client credential flow enables applications to run without user interaction, using its own credentials, instead of impersonating another user.
Client credential flow documentation
Requirements
In addition to the requirements from Pt.1
What is Graph API?
Microsofts Graph API is a RESTful web API, providing a unified endpoint for accessing data across all of the Microsoft 365 services. With it, developers can build applications that interact with M365 services, allowing them to retrieve and manipulate data without leaving their application.
Full documentation for Graph API can be found here - Graph API documentation
What is an Azure App Registration?
An Azure App Registration is an identity for your application, which can be used to authenticate and authorize users and services to access Azure resources
Configuration our requirements
Installing our requirements is super simple! So lets just reuse our existing Hello World project and in our Terminal run the following 2 commands.
{% highlight csharp %} // Install required nuget packages dotnet add package Microsoft.Graph.Beta –prerelease dotnet add package Azure.Identity {% endhighlight %}
Once done, we’ll be able to build some functions to query the API. But before we get too ahead of ourselves, we need an Azure App Registration.
Let’s create one in under 60 seconds
image)In this gif we do the following:
- Create a new app registration
- Give it a name
- Remove the default User.Read permission
- Add the Device.Read.All permission
- Grant consent for that permission change
- Create a client secret for authentication
Make sure you copy the client secret and keep it safe!
The API permissions we added are specific to the graph call we will run later in this post. Different calls will require different permissions, and we’ll talk about how to determine what is required in a later post.
Using client credential flow
Firstly, Lets add our Tenant Id, Client Id (Application Id) and Client Secret. To get this, click on the Overview of the App Registartion we created.
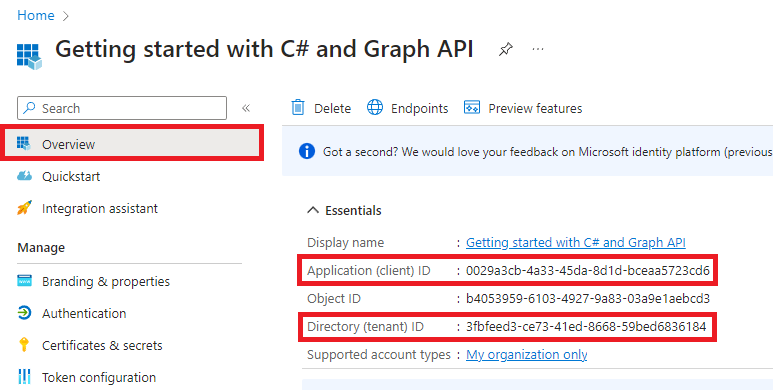
image) | |
Next, Let’s create a method to connect to our app registration, query Graph API’s beta Devices endpoint and get all devices in our tenant.
We won’t go into this method in extensive detail, however I have commented it and will share relevant docs on everything used at the end of this post.
| |
Doing the thing
So let’s run this, by pressing F5. We can watch our app build, run, and then write out the names of the devices in our test tenant.
image)Part 2.2
In Part 2.2 we’ll look at authenticating using interactive authentication.
Thanks for reading :)